 ★ SGL User's Manual ★ PROGRAMMER'S STRUCT
■ | Advance ▼
PROGRAMMER'S STRUCT 1. About Sega Saturn 3D game library
Sega 3D Game Library (abbreviation: SGL) is a group of functions that can control 3D graphics provided for software developers for Sega Saturn. Each function in the library (especially each function in the arithmetic library) is an algorithm designed by a programmer who is proficient in Saturn's processing power, so high-speed processing is possible.
This chapter describes the procedure for software development using the Sega 3D game library and precautions when using the library.
1-1. Programming work flow
- The flow of programming work for Sega Saturn software using SGL is as shown in the figure below.
Figure 1-1 Programming work flow
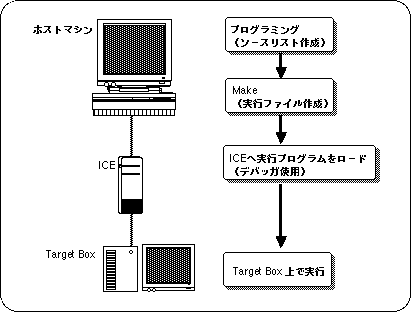
- ● Host machine
- Performs programming work, compilation, debugging, etc.
- ● Make
- Generates an executable file that includes compilation work.
- ● ICE
- Emulates the operation of SH2 of the main CPU of Sega Saturn. By loading the executable program into the ICE, you can check the operation of the created program.
- ● Debugger
- You can load, run, and debug at the source level.
- ● Target box
- It can be connected to ICE and operates in the same way as Sega Saturn.
 | For details on how to use the ICE and debugger, see the respective manuals. |
- HITACHI E7000 SH7604 emulator
- SEGA SH7604 E7000 Graphical user interface software
|
Host machine settings
- The following two points are required to set the environment of the host machine. These settings
“.Cshrc” or “.tcshrc”
It is necessary to set it in a script such as, or register it in your own script.- Add the path for the debugger to the path environment variable.
example
Set △ path = ($ path / usr / local / lib / sh2 / GUI)
△ = Space - Set the SHC library path, debugger help path, ICE address, and the above three environment variables.
Figure 1-2 Setting environment variables| ● Environment variables ● | |
| setenv SHC_LIB | <Library path> |
| setenv SH76GIHOST | <IP address> |
| setenv HELPPATH | <Help path> |
ICE settings
- The connection between the ICE and the host machine requires some initial settings such as network ID settings and host machine registration. This is explained below.
- ● Connection between ICE and terminal
- Remove the ICE floppy disk.
- Turn off S8 of the ICE rear DIP switch.
Connect a laptop computer and ICE with RS-232C.
(Connect to the CRT on the E7000 side) - Start the terminal software on the computer side.
| Precautions when using Wterm If you have made various settings, press the [Control] + [GRAPH] + [S] keys at the same time to complete the connection. If you have not made various settings, you need to match the settings of ICE and Wterm. For ICE settings, refer to page 29 of the "ICE Emulator User's Manual". |
- ● IP address (ID on the network) setting
- If the connection is successful, the following message will be displayed.
- START ICE
- S: START ICE
- R: RELOAD & START ICE
- B: BACKUP FD
- F: FORMAT FD
- L: SET LAN PATAMETER
- T: START DIAGNOSTIC TEST
- (S / R / B / F / L / T)?
- When the message is output , enter "L " and the following message will be displayed.
- IP ADDRESS = XXXX
- Enter the address you want to set here. for example,
- IP ADDRESS = XXXX123.456.78.987
- Turn off the power when the input is completed.
- This completes the address setting.
- ● Host machine registration
- Connect the network.
- Turn on S8 of the ICE rear DIP switch.
(Turn it to the right toward the back to turn it on) - Turn on the ICE.
- Run the “telnet” command on your workstation. for example,
- telnet 157.109.50.120 or telnet [hostname | IP address]
- When " (file name / return)? " Is displayed, please return.
- When the prompt ":" is displayed, enter the following.
A list of registered workstations is displayed.- LAN_HOST; S
(You can also enter "lh; s". "Lllhh ;; ss" will be displayed on the screen.)- When " PLEASE SELECT NO? " Is displayed, select the number (01 to 09) you want to register or change.
- Enter the host name (the workstation that controls the ICE).
- example)
- 01 HOST NAME SUN214? SUNXXX
- SUNXXX = host name of the host machine to use
- Enter the IP address of the host.
- 01 IP ADDRESS? 157.109.50.47
- 157.109.50.47 = Hostname of the host machine to use
- When all the entries are completed, the following message will be displayed.
- PLEASE SELECT NO ?. [RET]
- Press the “ctrl” + “]” keys to terminate the “telnet” command.
- The prompt will be “telnet>”, so enter “quit” to exit.
- Turn off the ICE.
- Insert the floppy disk into the ICE and start the ICE again.
- This completes the ICE settings.
Make file setting / execution
- Make follows a file that describes a set of steps and rules called a “Make file” to generate a sequence of commands that the UNIX shell executes. Make can efficiently control the relationships between files that are related to each other, so if you change only one of multiple source files, for example, save the trouble of recompiling all the source files. It has various functions.
SGL prepares a dedicated Make file. By executing the Make command, the source programs specified in this file will be compiled and an executable file will be automatically generated.
| This Makefile should be in the same hierarchy as the source file. |
- When the user creates a new application, the Make file needs to be recreated accordingly. Please refer to commercially available books for Make functions and formats.
Reference book example: make (Keigaku Shuppan / Andrew Olam, by Steve Talbot)
Debugger startup / initial settings
- The HITACHI E7000 ICE is controlled by software with a dedicated graphical user interface (GUI). This software is called "debugger" in this manual. The following describes how to start and initialize this debugger.
- Power on the ICE first, then the target (when turning off the power, turn it off in the reverse order).
- Creating files for automation Create two files , "gish " and " PRESET", in the current directory.
- gish
- gish76 △ PRESET
- PRESET
- HOST △ Host machine △ Login name △ Password
- RS
- G
- △ = Space
- The settings in these files allow you to automate the following tasks:
- Set HOST NAME, USER NAME, and PASSWORD in the "HOST dialog box".
- Reset the target
- Since gish is executed as a shell script, the execution right is set by the chmod △ + x △ gish command. (△ = space)
- Starting the Debugger Enter “gish” on the host machine and return to start the debugger.
If the following message appears during startup and you are waiting for input, click in the window to enable key input and return.- (file name / return)?
- Click “STOP” when the target is reset and the initial screen is displayed.
- Load the initial program Type “g 400” and click “STOP” when the screen disappears.
- Development settings (disable interrupts)
Select "REGISTER" from the [VIEW] menu to display the "Register Dialog Box".
Enter “000000f0” in the status register (SR) and click “ENTER”.
| This development setting is for using ICE. There is no need to set it in the software that is actually released. |
Load / execute the program
- I will explain how to load and execute an executable program into ICE using a debugger.
| If you do not want to use an initialization file such as "PRESET" explained in the previous section, select "HOST" from the [FILE] menu to open the "HOST dialog" and enter HOST NAME, USER NAME, and PASSWORD. Also, enter “rs [return] g [return]” in the command area of the debugger to reset the target. |
- Select [LOAD] → “PROGRAM FILE” from the [FILE] menu and enter the file name with the full path.
- Click “LOAD”.
The executable program is now loaded.
| If you are using tcsh for USER's LOGIN SHELL, FTP will not work and the executable will not load unless tcsh is registered in the / etc / shells file on the host machine.
For details, see reference books on FTP. |
- Select "GO" from the [EXECUTION] menu.
- Click the "START ADDRESS" input area in the "GO dialog box", move the character cursor, and enter "6004000" in the same area. Next, select “order” from the pull-down menu of the “START MODE” button and click “Done”.
- The executable program will now start running.
debug
- ● View source program
- Select "SOURCE DISPLAY" from the [VIEW] menu to display the "SOURCE DISPLAY Dialog Box".
- Click the program name you want to display to highlight it.
| Each time you click the mouse button, the highlighted area expands. It is OK if a specific line including the path name can be inverted. |
- Click “DISPLAY”.
Clicking “DISPLAY” while loading or running the lease program will result in an error. Click after waiting for the ICE command due to the end of loading or STOP.
| Click “CANCEL” to clear the dialog box. |
- ● Trace
- The trace function allows you to trace the source program step by step.
- After executing the program, double-click the part surrounded by the frame of the list part in the figure below with "STOP" clicked or the above source program displayed. The beginning of the line is reversed.
Figure 1-3 Trace from source program
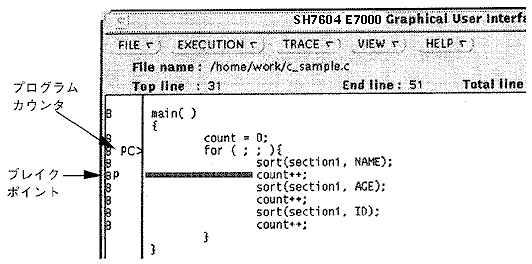
- Now click “SET”.
Breakpoint [P] is set. However, it cannot be set for lines without B. - Select "GO" from the [EXECUTION] menu.
The program counter [PC>] stops at the breakpoint [P].
- There are two ways to trace step by step from here.
- STEP: When you come to a subroutine, trace the steps of the subroutine step by step
- STEP_OVER: When you come to a subroutine, trace the subroutine as one step
■ | Advance ▼
★ SGL User's Manual ★ PROGRAMMER'S STRUCT
Copyright SEGA ENTERPRISES, LTD., 1997