SOUND Manual

Sound box check method


Basic operation check method of Saturn Sound Tool


  1. First, turn on the target machine (Saturn Sound Box) and Macintosh. After turning on the power, the BOOT ROM in the sound box boots and initializes the chip. When this initialization (usually 1 or 2 seconds) is completed normally, the LED on the back will blink in a flowing manner from LED1 to LED8.
    At this time, if you try to connect SCSI using software such as SCSI Probe from Macintosh, "SATURN DEVELOP-BOARD 1.00" will be recognized as SCSI No. 6.

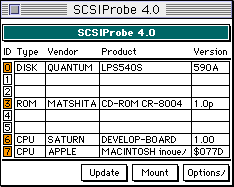
    A SCSI connection is important because all Sega Saturn sound tools control the soundbox through SCSI communication. Connect the cable to the Macintosh as short as possible, and use a reliable one.

    * If there is a problem with the above conditions, it is possible that there is a hardware problem with the sound box or Macintosh.


  1. Then launch the sound tool Snd Simulator from your Macintosh. At this time, Snd Simulator automatically transfers the sound driver to the target machine (sound box) via SCSI. The same is true if you select "Transfer Sound Driver" from the File menu. The sound driver is a file named "SDDRV.TSK" in the same folder as the Snd Simulator, and is the program code for the CPU of the sound box, 68000 (transfer address is from 01000h). Similarly, "SYSTBL.TSK" is a system table referenced by the sound driver, and is transferred at the same time as the sound driver (transfer address is from 0400h). "SDDRVS.TSK" is a combination of these two that omits unnecessary processing (control of the rear LED, etc.) of the sound driver Sega Saturn actual machine, and this is the programming box (MODEL-S) or the sound for the actual machine. It is a driver (transfer address starts from 0h). This "SDDRVS.TSK" is basically not used for sound data production, but by performing "Transfer S-Box Sound Driver" from the function menu and transferring "SDDRVS.TSK", the actual machine You can simulate the sounding condition with the same sound driver as.
    After starting SndSimulator, try "Starting Sound System" from the File menu. This will start the transferred sound driver to work. If the sound driver is operating normally, LED1 and LED3 of the LED on the back will blink (If a MIDI keyboard etc. is connected to the sound box, LED7 or LED8 will also be activated by MIDI active sensing. It may blink).

    * If there is a problem with the above status, SCSI communication between the sound box and Macintosh may not be working properly.


  1. Try opening the sample soundmap. When you open the soundmap for the first time, you should get a "File not found" error when transferring, but that's okay.
    SndSimulator searches for the data (data file) to be transferred based on the path (what file name in which folder on which disk) and transfers it. If this path is not set correctly, you will get a "File not found" error. In this case, refer to the SndSimulator manual and set the path correctly.
    After setting the path, select "Save" from the file menu, and then the data will be transferred using the new path. If you move or delete the transfer data file registered in the sound map on the Macintosh Finder, set the path again in the same way.
    The LED on the back stops blinking during SCSI communication, but it will start blinking again if the communication ends normally. If the LED stays lit, the SCSI communication or sound driver may have hung, so reset the soundbox and transfer the sound driver again.
    Then select "Sound Simulator" from the Function menu, click Sequence 0 to highlight it in black, and press the Start button. The sample song should play.

    * If there is a problem with the above conditions, there is a possibility that the appropriate files have not been copied to the HD of the Macintosh, or there is a problem with the connection between the sound box and the playback device such as an amplifier or speakers.


SOUND Manual
Copyright SEGA ENTERPRISES, LTD., 1997