3.1 Seamless branch
Figure 3.1 Continuous playback 1
Figure 3.2 Continuous playback 2
Figure 3.3 Branch playback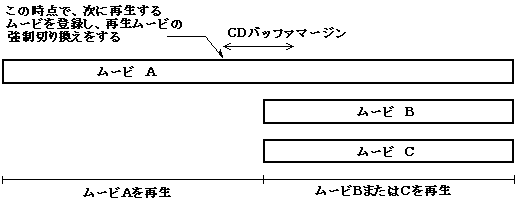
- For seamless branching movies, the sound content (sampling rate, number of quantization bits, number of channels) and frame rate should be the same.
- Place the seamless branching movie on the CD-ROM as close as possible. Also, arrange them in the order of branching from the inside to the outside of the CD-ROM.
- Seamless branching is not available for multi-motion playback.
3.2 Multi-motion playback
- Channel interleave multiple movies on a CD and play them from the CD at the same time
- Play the movie on the memory and the movie on the CD at the same time
- Load multiple videos into memory and play them at the same time
Figure 3.4 Playback of multi-motion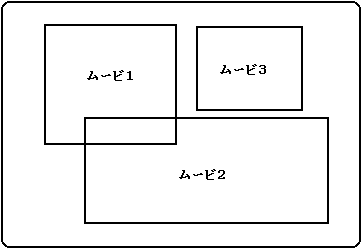
- When channel interleaving multiple moves on a CD, specify the exact data rate (bit rate) of each move and interleave (for details, refer to the manual of the virtual CD).
- If you want to have sound for each of multiple videos, reduce the sampling rate (about 11KHz).
- Seamless branching is not possible from multi-motion playback.
3.3 Super Impose
Figure 3.5 Super Impose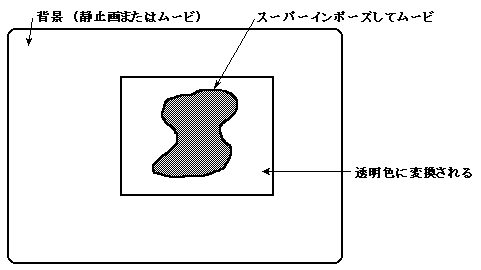
- For example, in the case of a blue-back shot movie, select the background blue as the target color. Next, set the color to be replaced to "Red = 0, Green = 65536, Blue = 0" and replace it with pure green. Use the similarity slider or repeat replacements to make the background a pure green color. At this time, be careful that the color to be replaced is not included in the subject to be super-imposed. If so, it can be pure red, white, black, etc. instead of green.
- When the color replacement is complete, the movie is Cinepak compressed.
- Next, when converting with MovieToSaturn_J, click the "Options" button, select chroma key processing, and then enter the color value to be keyed out (Fig. 3.6). If the replaced color is pure green, enter "Red = 0, Green = 255, Blue = 0" and then convert to SEGA SATURN format.
After that, execute steps 2 and 3 in the same way as "Color replacement".
Figure 3.6 MovieToSaturn_J Options Dialog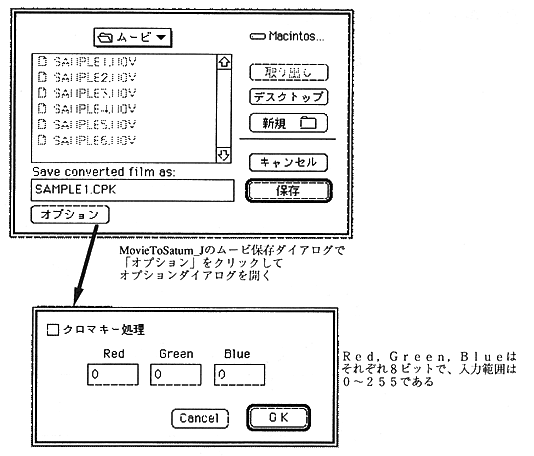
caution | The super-imposed movie cannot be keyed out cleanly because the edge part changes to the specified color due to Cinepak compression. In this case, use the CPK_SetKeyOutRange function to adjust the range of colors to key out. |
|---|
3.4 Keyframe Pose
Cinepak is a compressor that supports difference frames, and you can specify keyframes during compression to perform time compression. For example, if you say "keyframes every 30 frames", it will consist of 1 keyframe and 29 diff frames (actually, the Cinepak compressor may insert keyframes automatically, so it's actually Keyframes are not always inserted every 30 frames). The difference frame has a problem of a kind of blocking phenomenon that the time-compressed part looks like a block. If you compress without specifying a key frame, only each frame space compression will be performed and there will be no difference frame.
Figure 3.7 Relationship between keyframes and difference frames
3.5 Still image playback
Figure 3.8 Flow of still image playback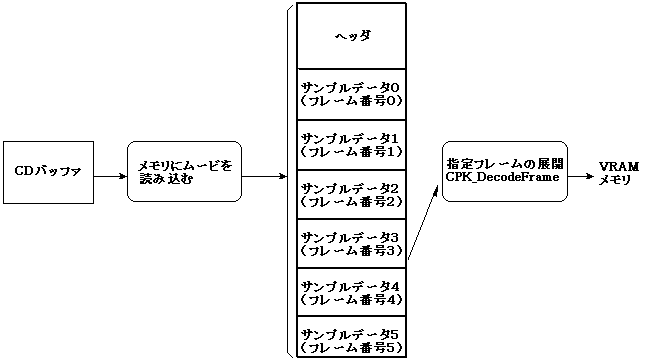
- Compress the still image movie with Cinepak without adding sound.
- The frame rate for Cinepak compression is arbitrary (meaningless).
- Never specify keyframes when compressing Cinepak.
- All still image videos must be loaded in memory. For a full-screen frame size, a 10-20 frame movie file is a good choice.
▲ Back | Forward ▼
 ★ MOVIE TOOLS GUIDE ★ Cinepak for SEGA Saturn
Copyright SEGA ENTERPRISES, LTD ,. 1997