★ Graphic Tools Guide ★ 3D Editor User's Manual
▲ Back | Forward ▼
3D Editor User's Manual / Window
■ Main window
- This is a window for basic editing work.

■ "File" menu
- Performs file management such as input / output of model files. In addition, processing such as termination is also executed in this menu.
- ◆ Open
- Open the already saved SG3 format file. If the file is already open, it will be closed automatically.
- caution!
- Only one map can be edited with "3D Editor".
- ◆ Save
- Save the file you are currently working on in SG3 format.
- ◆ Save as
- Name the file you are currently working on and save it as a separate file.
- ◆ 1-4
- 4 files are displayed in order from the recently opened or saved file.
- ◆ End
- Exit "3D Editor".
■ "Edit" menu
- Makes an extended selection of polygons. You can also set the work environment for using "3D Editor" here.
- ◆ Undo
- Cancels the previous operation. Please note that some functions cannot be undone.
- ◆ Cut out
- ◆ Copy
- ◆ Paste
- ◆ Delete
- This currently can not be used.
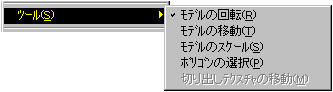
- ◆ Tools
- Each submenu corresponds to a button in the toolbox.
- ◆ Model selection
- Selects the entire model, including the currently selected polygons.
- ◆ Material selection
- Selects all polygons that have the same material information as the currently selected polygon.
- ◆ Select all
- Select all polygons included in all models.
- ◆ Deselect
- Deselect all polygons in all models.
- ◆ Properties
- Make various environment settings.
- 【Color】
- Specifies the color assigned to the representation and function of each editing task.
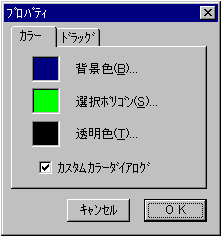
- ● Background color Specify the background color.
- ● Selected polygons Specifies the color of the mesh used to represent the selected polygons.
- ● Transparent color Specify the color to be treated as the transparent color when editing the texture data.
- ● Custom color dialog When checked, the color selection dialog displays a custom dialog using the RGB slider.
If it is not checked, the standard Windows color selection dialog is displayed. - 【drag】
- Select how to display the model while dragging the mouse on the main window, such as rotate or move. It is mainly used for the purpose of absorbing operability problems caused by the speed difference of the development machine.
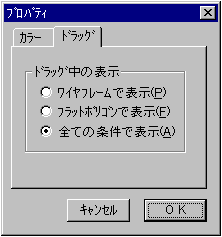
- ● Display in wire frame Displays the model in wire frame while dragging. This is the most comfortable way to operate.
- ● Display as flat polygon While dragging, the model is displayed as a polygon (non-texture map) for which the light source has been calculated. Although the processing speed will be slightly slower, it is a method to operate while maintaining the representation of the model to some extent even while dragging.
- ● Display under all conditions The display does not change even while dragging. The conditions vary depending on the content of the material information, but this is the heaviest operation method.
■ "View" menu
- Shows / hides subwindows and toolboxes. In addition, the target display processing corresponding to "SS Monitor / SS Viewer" is also performed here.
- ◆ Toolbox
- Show / hide the toolbox.
- ◆ Attributes
- Shows / hides the attribute window.
- ◆ Hierarchical structure
- Shows / hides the hierarchical window.
- ◆ Texture list
- Show / hide the texture list window.
- ◆ Target display
- Transfer / display the file you are currently working on to the target. In order to use this function, "SS Monitor" must be started and "SS Viewer" must be running in advance.
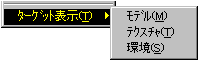
- ● Texture <BR> Transfers texture data.
- ● Model <BR> Transfer model data.
- * For the texture map data, only the texture number information of the attribute data of each surface is transferred. Actually, in order to apply the texture map to each face, it is necessary to separately transfer the texture data corresponding to the model.
- ● Environment <BR> Transfers environmental information such as the direction and color of the light source and the environment (ambient) color.
■ "Option" menu
- Set the 3D environment such as the light source, projection surface, and camera. You can also perform special operations on vertices and faces here.
- ◆ Light source setting
- Set the direction and color of the light source.
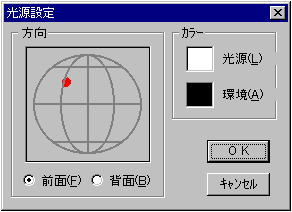
- "direction"
Move the control points indicated by the red circles to specify the direction of the light source.- ● Front Specify the front hemispherical area.
- ● Back Specify the hemispherical area on the back.
- "Color"
Specifies the color of the light source and environment.- ● Light source Specify the color of the light source.
- ● Environment Specify the ambient color.
- ◆ Screen settings
- Make various settings related to the 3D projection plane (screen).
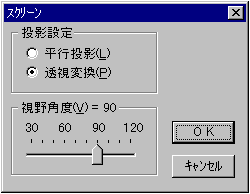
- "Projection settings"
Select the projection method on the screen.- ● Parallel projection Ignores the depth (Z value) and projects.
- ● Perspective conversion Projects with perspective according to the depth. Normally, select this.
- "Viewing angle"
- ● Slider Specifies the spread of the projection range with respect to the line of sight by an angle. This parameter is invalid when "Parallel projection" is selected.
- ◆ Camera settings
- Select the default camera (reserved viewpoint position) or custom camera (user-specified viewpoint position).
- ◆ New camera
- Adds the current viewpoint as a new custom camera with the number selected in the submenu. If you select a camera that already exists, it will be replaced with the current viewpoint.
- ◆ Rotation of vertices (only when polygon is selected)
- Changes the definition order of the vertex numbers that make up the selected polygon. It is mainly used when you want to change the direction of texture mapping without changing the texture data. Please note that if you apply this menu to triangular polygons, the saved data may not be available in SGL etc.
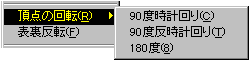
- -90 degree clockwise Rotate the definition of the vertex number 90 degrees clockwise when viewed from the polygon table.
- -90 degree counterclockwise The definition of the vertex number is rotated 90 degrees counterclockwise when viewed from the polygon table.
- -Rotate the definition of the 180 degree vertex number 180 degrees clockwise when viewed from the polygon table.
- ◆ Invert front and back (only when polygon is selected)
- Change the definition order of the vertex numbers so that the normal vector of the selected polygon points in the opposite direction. If a texture has been applied, manipulate the texture inversion flag in the attribute information to preserve the original image.
- ◆ Plug-in

- ● Gouraud table generation If real-time Gouraud (Gouraud shading that calculates the light source) is applied to the attribute information of the selected polygon, change it to Gouraud shading that uses a fixed table (does not calculate the light source). The gourd table is generated by applying the color and direction of the current light source.
It is mainly used for the purpose of reducing the processing time of real-time gourd (which takes a relatively long time).
■ "Help" menu
- Displays a help file that explains how to use "3D Editor". It also displays the information of "3D Editor".
- ◆ Table of contents
- Displays the table of contents of the help file.
- ◆ Version information
- Information such as the version of "3D Editor" is displayed.
▲ Back | Forward ▼
★ Graphic Tools Guide ★ 3D Editor User's Manual
Copyright SEGA ENTERPRISES, LTD ,. 1997