 ★ Graphic Tools Guide ★ 3D Editor User's Manual
▲ Back | Forward ▼
3D Editor User's Manual / Window
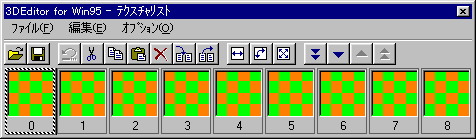
■ Texture window
- This is an explanation of the window that is displayed when "View"-> "Texture List" is selected in the main window.
■ "File" menu
- Performs file management such as input / output of texture files.
- ◆ Open
- Open the already saved SGT format file. If the file is already open, the texture data will be automatically overwritten with the parts defined in the file.
- ◆ Save
- Save the file you are currently working on in SGT format.
- ◆ Save as
- Name the file you are currently working on and save it as a separate file.
- ◆ 1-4
- 4 files are displayed in order from the recently opened or saved file.
- ◆ Import
- Open the 2D image file that is the material of the texture, and register it as texture data at the position of the texture number currently selected in the texture window. If the texture data already exists, it will be overwritten.
- ◆ Export
- Save the texture data to a 2D image file.
- 【dialog box】
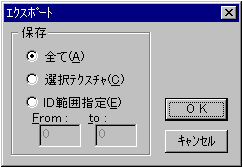
- "keep"
Select the conditions for saving the texture data.- All registered data will be saved.
- Selected Texture Saves the currently selected texture.
- ID range specification Specify the range of texture data to be saved by the texture number.
■ "Edit" menu
- Edit texture data such as cut and paste. It also displays information such as the size of the texture data.
- ◆ Undo
- Cancels the previous operation. Please note that some functions cannot be undone.
- ◆ Cut out
- Cuts the selected texture data. The clipboard is saved in the clipboard.
- ◆ Copy
- Copies the selected texture data. The copied data is saved in the clipboard.
The clipboard data is also stored in DIB bitmap format, so you can "paste" the data into other applications. - ◆ Paste
- Pastes the texture data saved in the clipboard at the position of the currently selected texture number. Other applications can also "paste" clipboard data stored in DIB bitmap format.
- ◆ Delete
- Erases the selected texture data.
- ◆ Delete all
- Deletes all registered texture data.
- ◆ Insert
- Inserts a blank texture at the position of the selected texture number and sorts it.
If you hold down the "Shift" key while specifying, you can sort the texture data while preserving the association. - ◆ Backspace
- Deletes the selected texture data, and sorts the texture data with the subsequent numbers.
If you hold down the "Shift" key while specifying, you can sort the texture data while preserving the association. - ◆ Clear clipboard
- Deletes the data stored in the clipboard.
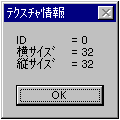
- ◆ Texture information
- Information such as the size of the selected texture data is displayed.
■ "Option" menu
- Change the direction and size of the texture data. Basic operations such as the texture cutout function are also performed here.
- ◆ Inversion
- Inverts the specified texture symmetrically with the center line.
- 【dialog box】

- "Reversal direction"
Specify the direction to invert.- Horizontal direction Flip horizontally.
- Vertical direction Flip vertically.
- "Modified texture"
Specifies the range of texture data to be inverted.- Selected Texture Inverts the currently selected texture data.
- ID range specification Specify the range of texture data to be inverted by the texture number.
- ◆ Rotation
- Rotates the specified texture.
- 【dialog box】
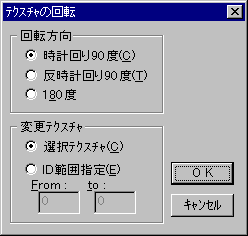
- "Direction of rotation"
Specify the direction to rotate.- 90 degrees clockwise Rotate 90 degrees clockwise.
- Counter-clockwise 90 degrees counter-clockwise to rotate 90 degrees.
- Rotate 180 degrees 180 degrees.
- "Modified texture"
Specifies the range of texture data to be rotated.- Selected Texture Rotates the currently selected texture data.
- ID range specification Specify the range of texture data to be rotated by the texture number.
- ◆ Resize
- Changes the size of the specified texture.
- 【dialog box】
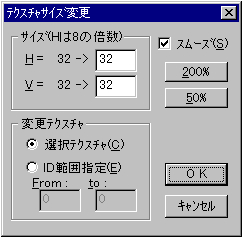
- "size"
Specify the direction to rotate.- H
Enter the changed horizontal size. - V
Enter the changed vertical size
- "Modified texture"
Specifies the range of texture data to be resized.- Selected Texture Resizes the currently selected texture data.
- ID range specification Specify the range of texture data to change the size by the texture number.
- "Smooth"
If the size after the change is larger than before the change, make the jaggies less noticeable.- "200%"
Double the vertical and horizontal size.- "50%"
Increase the vertical and horizontal size by 0.5 times. - ◆ Cutout texture display
- The currently selected texture data is overlaid on the main window. The displayed texture can be freely resized and repositioned on the main window using the "Cut Texture Move" tool.
- ◆ Texture cutting
- Based on the size and position information of the currently displayed cutout texture data, the texture data is automatically generated and applied to the selected polygons.
- ◆ Send
- ◆ Back
- ◆ Page feed
- ◆ Page return
- Scrolls the texture list as desired.
■ Texture cutout function
- The texture cutout function performs parallel projection in the line-of-sight direction to the selected polygon based on the currently displayed size and position information of the cutout texture data. Based on the relative coordinate information of the vertices of each projected polygon, the optimization is based on the assumption that the image currently displayed in the main window will not be damaged as much as possible and that the transformation sprite processing in Sega Saturn will be performed. Generates the texture data that has been created.
The newly generated texture data is automatically applied to each corresponding polygon, and the result is immediately reflected in the attribute information.- 【dialog box】

- "size"
Specifies the size of the texture data to generate.- H
Enter the horizontal size of the texture data. - V
Enter the vertical size of the texture data.
- "offset"
Select the processing method for the part that exceeds the size of the currently displayed cutout texture data.- Transparent Process with transparent pixels.
- Repeated cutout Processes the edge data of the texture data repeatedly.
- Wrap around cutout Texture data is wrapped and processed.
- "Additional position"
Specify the start number to place the generated texture data. The multiple texture data that have been cut out will be placed sequentially after the texture number specified here. If the texture data already exists, it will be overwritten by the generated data.- Immediately after Add Places immediately after the selected texture number.
- Finally, we arranged to be added to the end of the texture data that has been added registered.
- ID specification Places from the entered texture number.
- "Smooth"
Process the cut out texture data so that jaggies are not noticeable.- "Material color"
The transparent pixel part of the cut out texture data is processed using the polygon color set for each surface.
▲ Back | Forward ▼
★ Graphic Tools Guide ★ 3D Editor User's Manual
Copyright SEGA ENTERPRISES, LTD ,. 1997