HARDWARE ManualSCU User's Manual
BackForward
SCU User's Manual / Chapter 2 Operation Explanation

■ 2.2 Interrupt control

Table 2.1 details the bit allocation for interrupt factors. Bit allocation represents the interrupt status register. The interrupt level is lowest at level 1 and highest at level F. A detailed explanation of each interrupt factor is given below.

Table 2.1 Interrupt factors
Bit allocation Interrupt factor Interrupt source Vector number level
bit 0 V-blank-IN VDP2 Vector 40 Level F
bit 1 V-blank-OUT VDP2 Vector 41 Level E
bit 2 H-Blank-IN VDP2 Vector 42 Level D
bit 3 Timer 0 SCU Vector 43 Level C
bit 4 Timer 1 SCU Vector 44 Level B
bit 5 DSP-End SCU Vector 45 Level A
bit 6 Sound-Request SCSP Vector 46 Level 9
bit 7 SMPC SMPC Vector 47 Level 8
bit 8 PAD interrupt PAD Vector 48 Level 8
bit 9 Level-2 DMA finished SCU Vector 49 Level 6
bit 10 Level-1 DMA finished SCU Vector 4A Level 6
bit 11 Level-0 DMA finished SCU Vector 4B Level 5
bit 12 DMA-Illegal SCU Vector 4C Level 3
bit 13 Sprite drawing finished VDP1 Vector 4D Level 2
bit 14
bit 15
bit 16 External interrupt 00 A-Bus Vector 50 Level 7
bit 17 External interrupt 01 A-Bus Vector 51 Level 7
bit 18 External interrupt 02 A-Bus Vector 52 Level 7
bit 19 External interrupt 03 A-Bus Vector 53 Level 7
bit 20 External interrupt 04 A-Bus Vector 54 Level 4
bit 21 External interrupt 05 A-Bus Vector 55 Level 4
bit 22 External interrupt 06 A-Bus Vector 56 Level 4
bit 23 External interrupt 07 A-Bus Vector 57 Level 4
bit 24 External interrupt 08 A-Bus Vector 58 Level 1
bit 25 External interrupt 09 A-Bus Vector 59 Level 1
bit 26 External interrupt 10 A-Bus Vector 5A Level 1
bit 27 External interrupt 11 A-Bus Vector 5B Level 1
bit 28 External interrupt 12 A-Bus Vector 5C Level 1
bit 29 External interrupt 13 A-Bus Vector 5D Level 1
bit 30 External interrupt 14 A-Bus Vector 5E Level 1
bit 31 External interrupt 15 A-Bus Vector 5F Level 1

Table 2.2 shows the generic names for interrupt factors. In the following, explanations will be given generically.

Table 2.2 Generic term for interrupt factors
Generic term for interrupt factors Interrupt factor name
Blanking interrupt V-blank-IN
V-blank-OUT
H-Blank-IN
Timer interrupt Timer 0
Timer 1
DMA end interrupt Level 2-DMA end
Level 1-DMA end
Level 0-DMA end

◆ Blanking interrupt

There are three types of blanking interrupts: V-blank-IN, V-blank-OUT, and H-blank-IN. Figure 2.11 shows the details of the blanking interrupt. The blanking interrupt synchronizes with the display and signals the start and end of the display.

Figure 2.11 Blanking interrupt details

● V-Blank-IN

Indicates the end of display. From now on, if you try to display the data on the screen, it will not be displayed on the screen.

● V-Blank-OUT

Indicates the start of display. However, even if you notify the start of display, it will take some time (interval) until it is actually displayed, so take that time into consideration and interrupt it a little earlier. It also clears timer 0 data.

● H-Blank-IN

Indicates the end of display of one line. Timer 0 data is incremented at this timing.

◆ Timer interrupt

Timer interrupts include timer 0 and timer 1. The timer interrupt can be synchronized with the blanking interrupt mentioned above to generate an interrupt at a dot (point) on the screen.

● Timer 0

The value is cleared when a V-blank-OUT interrupt is received, and the value is counted up when an H-blank-IN interrupt is received. Compared to the timer 0 compare register (see register details), if the values are the same, a timer 0 interrupt is generated. Figure 2.12 shows the process of timer 0 generation.

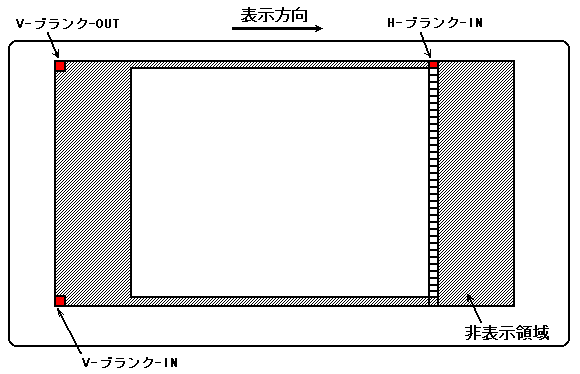
Figure 2.12 Timer 0 interrupt generation process
(Example when compare register = 19 is set)

● Timer 1

When an H-blank-IN interrupt is received, the data in the timer 1 dataset register (see register details) is set in timer 1. It counts down at a frequency of about 7MHz (1 dot drawing), which is 1/4 of the system clock, and when the value of timer 1 becomes 0, an interrupt of timer 1 occurs. Also, depending on the value of the timer 1 mode register (see details of the register), an interrupt can be generated at one point together with timer 0, or an interrupt can be generated at each line regardless of timer 0. Figure 2.13 shows the process of synchronizing with timer 0 and generating a timer 1 interrupt.

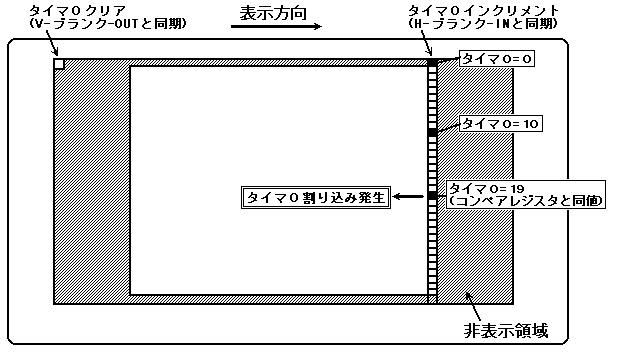
Figure 2.13 Timer 1 interrupt generation process (synchronized with timer 0)

Figure 2.14 shows the process of generating a timer 1 interrupt asynchronously with timer 0. Operationally, it is the same as when synchronizing, but it judges each line and generates an interrupt.

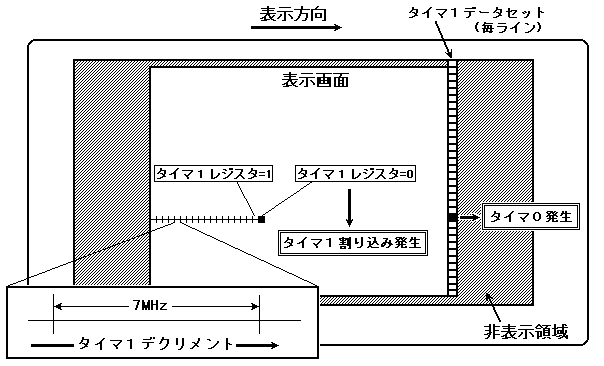
Figure 2.14 Timer 1 interrupt generation process (asynchronous with timer 0)
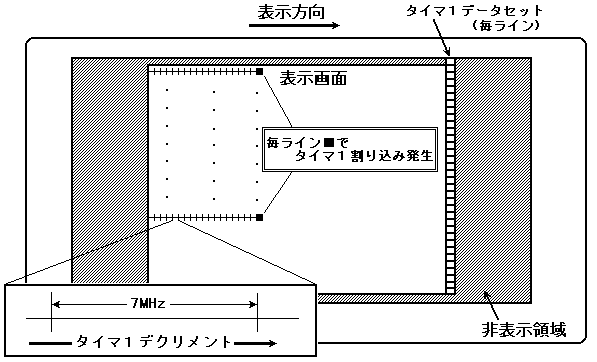
◆ DSP end interrupt

Due to the DSP ENDI instruction (see Section 4.5, "Instruction" ENDI instruction), the program execution control flag (see Section 3.3, E flag of the program control port section) of the program control port (see Section 3.3, Program control port section) is set. It is set and notifies that the program has finished. This allows the main CPU to retrieve the results calculated by the DSP.

◆ Sound-Request interrupt

This is an interrupt generated by SCSP. For example, when a CD (Compact-Disk) is connected, the SCSP uses an interrupt to notify the main to display this volume level meter on the screen.

◆ SMPC interrupt

Please refer to the "SMPC User's Manual" for details on the interrupts issued by SMPC.

◆ PAD interrupt

An interrupt generated by a user action. PAD is taken as an example, but in addition, a mouse etc. may be connected.

◆ DMA end interrupt

It is divided by level, but it notifies that the DMA transfer is completed. There are three DMA levels, from level 2 to level 0.

◆ DMA-Illegal interrupt

When attempting to execute DMA, if the parameter cannot execute it, this interrupt notifies that DMA cannot be executed.

◆ Sprite drawing end interrupt

VDP1 notifies you that drawing is complete.

BackForward
HARDWARE ManualSCU User's Manual
Copyright SEGA ENTERPRISES, LTD., 1997