 ★ SGL User's Manual ★ Data transfer
■ | Advance ▼
Data transfer 1. Design data
This chapter describes how to pass the 3D model data created by the designer and the 3D model data with texture to the programmer for embedding in the software.
It also describes the movement of the data required to texture the 3D model data.
1-1. Data flow
- The 3D model data modeled in SOFTIMAGE is passed to the programmer in the following flow.
Figure 1-1 Design data flow
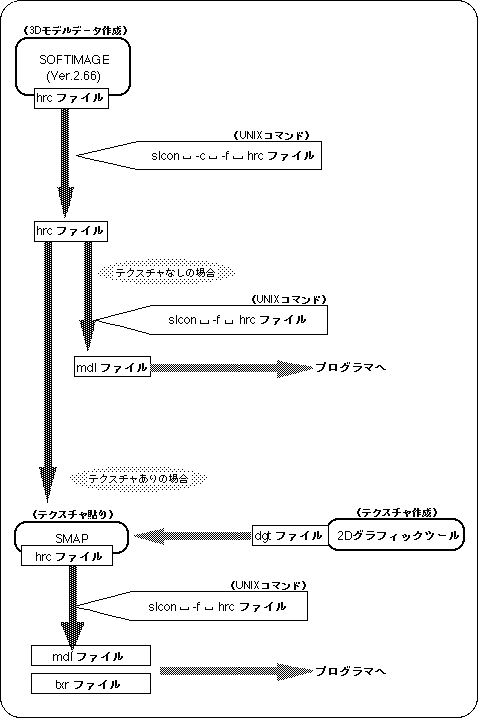
1-2. Conversion / check of SOFTIMAGE data
- Taking the TV monitor data created in the designer tutorial as an example, we will explain the procedure of data conversion, processing, and delivery in detail.
- ● Checking data
- Put out a UNIX shell. Therefore,
- cd STUDY / MODELS (line feed)
- Please enter. Now the path display is
- [(Home directory name) / STUDY / MODELS]
- Should have become. Now, ls (line feed) . There should be “SATURN_TV_SET.1-0.hrc” here.
- caution
- Since this is a version display, it is not necessarily "1-0", but if the name part is as above, there is no problem.
- here,
- cp SATURN_TV_SET.1-0.hrc ~ / CHECK (line feed)
- Please enter.
- caution
- The “~” is above the “TAB” key. “~” Indicates the home directory. It is a symbol that is often used because it is convenient.
- Here's another UNIX shell, where
- cd CHECK (line feed)
- Please enter ls (line feed). You can see that “SATURN_TV_SET.1-0.hrc” exists in this CHECK directory. Now, if you confirm that there are no .hrc files other than this file,
- slcon -c -f SATURN_TV_SET.1-0.hrc (line feed)
- Please enter. Then, the following is displayed.
Check SATURN_TV_SET.1-0.hrc ← File name: SATURN_TV_SET ← Model name Total of 3 nodes => 4
Total of 4 nodes => 36 ↑ O. K.
Total of 5 nodes => 0 ↓ N. G.
Total of 6 nodes => 0
Total of more nodes => 0
- The only models that can be put out on Saturn are those that have numbers only in the "Total of 3 nodes" and "Total of 4 nodes", and there should be no more than "Total of 5 nodes".
- caution
- Textures can be applied only to models that meet the above conditions. How to paste textures using “SMAP” is explained in “Chapter 6: How to use SMAP” in “Designer's Tutorial”.
- Finally,
- mkdir ~ / CONV (line feed)
- cp SATURN_TV_SET.1-0.hrc ~ / CONV (line feed)
- To copy the file as data to pass to the programmer.
- next,
- cd ~ / CONV (line feed)
- Type to change directories.
Please ls (line feed) here. There should be a file here.
Let's change the file name here.- mv SATURN_TV_SET.1-0.hrc sample.hrc (line feed)
- If you enter, the file name will be converted to “sample.hrc”.
- If you don't want to apply the texture:
- Use the file “sample.hrc” above to proceed to the next step.
- When applying a texture:
- Assuming that SAMP generated “sample_smap.hrc”, proceed to the next step.
1-3. Convert to the format passed to the programmer
- Then use the UNIX command “slcon” to convert “sample.hrc, sample_smap.hrc” to a format that can be passed to the programmer.
- File format when no texture is attached ・ ・ ・ sample.hrc
- File format when texture is pasted ・ ・ ・ sample_smap.hrC
- here,
- slcon -f sample.hrc (line feed)
- If you enter
- When the original data is sample.hrc (without texture)
sample.mdl
Generate a file of.- When the original data is sample_smap.hrc (textured)
sample_smap.mdl
sample_smap.txr
Generate a file of.- Copy these to the directory specified by the programmer.
■ | Advance ▼
★ SGL User's Manual ★ Data transfer
Copyright SEGA ENTERPRISES, LTD., 1997