 ★ SOUND Manual ★ Tone Editor User's Manual /
▲ Back | Forward ▼
Tone Editor User's Manual 7. Details about each dialog
- ● Voice input dialog
- Appears when you click on the voice window. All data entry and layer window invocations are done from this dialog.


- <About each dialog item>
- ◆ Layer (No item) button
- Invokes the layer window. The layer attributes are determined by the PCM <> FM switching button described later.
- ・ VoiceName
- The name of the voice. You can enter up to 31 single-byte characters.
However, the window can display up to 18 half-width characters and up to 9 full-width characters.- ・ Bend Range
- ・ Portamento
- ・ Volume Bias
- By moving the slider knob, you can set the value with the movement width set in the initial setting described later in the bar part.
- ◆ ayer No button
- You can increase the number of layers without opening the layer window. However, it cannot be reduced.
- ◆ CM <> FM switching button
- Determines the voice attributes.
Press this button to switch the display to PCM <> FM.- ・ Size
- Shows the size of this bank. This item cannot be edited.
- ● Layer input dialog
- This is a dialog for inputting the layer window when the voice attribute is PCM.
Appears when you click the layer window.

- <About each dialog item>
- ◆ Para (No item) button
- Invokes the layer parameter window.
- ・ FM item
- ・ Option item
- Free space for the future Nothing is currently set.
- ・ Start & End
- Sets the range of key splits. Central
 When you press the button, the following keys will be displayed and you can set the key split graphically.
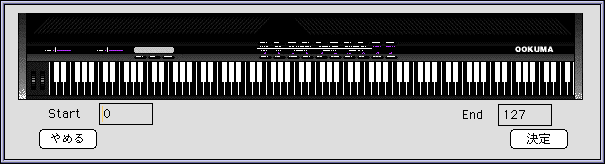
- In this example, the key split range is set to 0-127, so all keys are selected.
- ・ Other parameters
- The usage is the same as the voice input dialog described above.
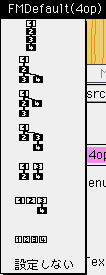
- ● FM layer settings
- If the number of layers is 2 to 4 before the voice has the FM attribute and the layer window is expanded, the initial settings for FM connection will be made. The following dialog will be displayed for initial settings.
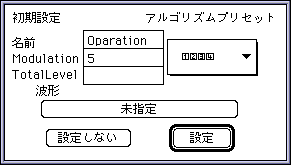
- <Details about each item>
- ◆ Name
- It is actually a numbered name in the basic form of the name given to each modulator & carrier.
- Examples Oparation 1, Operation 2, etc.
- ◆ Modulation
- Set the modulation value. Even if this value is set to 0, the connection itself will be performed.
- ◆ Total Level
- Set the total level.
- ● Algorithm presets
- Select how to connect the algorithm. The type of algorithm that can be selected changes according to the number of layers.
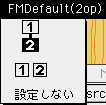
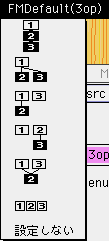
- White is the carrier and black is the modulator.
When these are selected, the connection and the position of each data in the layer window are preset.- ◆ Waveform button
- Sets the waveform selected here for all modulators & carriers.
- ◆ Set & do not set
- Decide whether to enable these settings.
- ● Layer parameter window
- It is a window to set the details of the layer data called from the layer window and FM layer window.
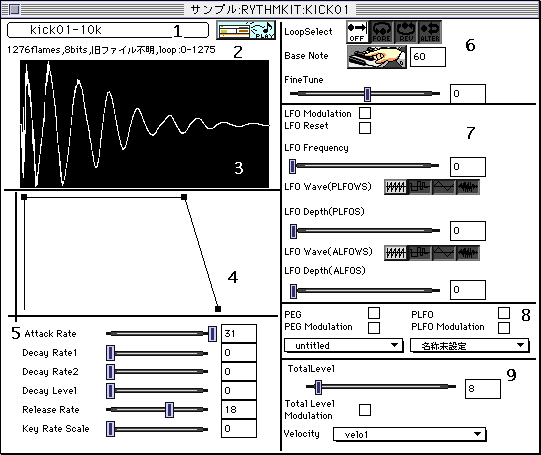
- <Details about each item>
- 1: Waveform button
- The button is offset to the upper left. Imports waveform data that is the original waveform of PCM.
-
 button
 - The captured waveform data is simply played back.
However, since the playback rate is not described in the file imported from the YAMAHA tone editor, it will be played at 44.1kHz.
Loop playback is not currently supported. - 2: Waveform information
- The information of the selected waveform indicates "number of frames", "bit length", "sampling rate", and "loop range". However, the file imported from the YAMAHA tone editor does not have a description of the playback rate, so in that case, the message "Old file unknown" is displayed.
- 3: Image of waveform data
- Displays an image of waveform data. The black-and-white inversion part shows the loop area.
- 4: EG image
- The set parameters are displayed as a simple image. You can operate the parameters by dragging the "■" that indicates each point.
- 5: EG setting
- Use the slider and text input to set the EG. The image and this item are linked.
- 6: Loop and key settings
- Loop button
 Does not loop.
 Loop playback from Start to End of the loop setting.
 Loop playback is performed from End to Start of the loop setting.
 Play back and forth between Start, End, and Start in the loop settings.
 - Base note button (
 )
) - Set the base note for the frequency setting.
There are two ways to set the base note, one is to enter the numerical value directly and the other is to press the button. When you press the setting button, the following dialog will be displayed.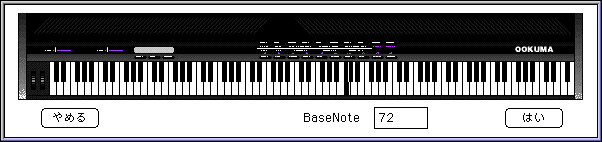
- The usage is the same as the key split except that you cannot select multiple keys unlike the key split setting.
- 7: LFO related parameters
- Please refer to the voice input dialog mentioned above for how to use the slider text data input part.
The buttons for setting LFO Wave are as follows. Sawtooth wave
 Square wave
 Triangle wave
 noise
noise - 8: PEG-related parameters
- 9: TotalLevel related parameters
- Each setting in the pop-up menu is assigned a table that can be set in the "Settings" menu described later.
▲ Back | Forward ▼
★ SOUND Manual ★ Tone Editor User's Manual /
Copyright SEGA ENTERPRISES, LTD., 1997