SGL User's ManualSOUND STRUCT
BackForward
SOUND STRUCT / 2. Make a song

2-3. Assign sounds to keys

This time, use the created waveform to actually assign a sound to the keyboard. At the same time, set the key touch strength and sound change.

1) Target initialization
To use the Tone Editor, you need to initialize the target in the sound simulator. Launch the sound simulator and open the map.
The map to be opened at this time may be the sample map file attached to the SEGA Sound Tool.

Figure 2-10 Opening the map

Then select "Start Sound System" from the File menu. The sound system is started.

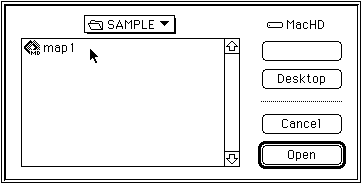
Figure 2-11 Select "Start Sound System"

This completes the target initialization.

2) Start Tone Editor
Start the Tone Editor.

3) Creating voice data
When creating a new voice, the number of voices (Number of Voice) is 15 by default, but let's start with about 2 for the time being.
You can add or remove the number of voices later.
If you created the sequence data first, set as many as the number of instruments.

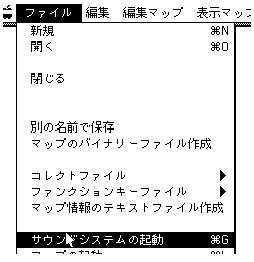
Figure 2-12 Setting the number of voice data

After completing the above steps, the voice window will be displayed.

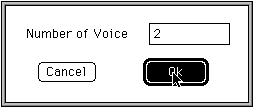
Figure 2-13 Voice window

This window has a number and a name.
Later, when setting in the pop-up menu, it is difficult to understand that the voice name is untitled, so it is a good idea to give it the name of the instrument.
Next, set each tone.

Double-click on the number on the left. As with the number of voices, you will be asked for the number of layers, so set it to about 4.
The number of layers sets how many sound waveforms are assigned to a certain key range.

Originally, if you attach each waveform to each key, it should sound exactly the same, but that will run out of memory.
Reducing the size of the waveform and deciding the number of waveforms to use without reducing the sound quality as much as possible is a fairly difficult task, but it is the most important part, so please try various things and try again and again.

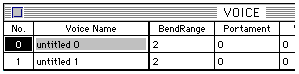
Figure 2-14 Setting the number of layers

The layer window is displayed.

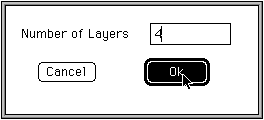
Figure 2-15 Layer window

4) Creating layer data
Various settings can be made by double-clicking in each frame.

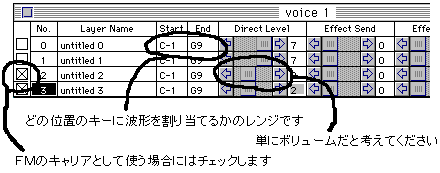
Figure 2-16 Layer data settings

If the set AIFF file is changed while the AIFF file is selected, set another AIFF file and then select the file again, or change the file name. Please select the file.
Note that if you do not do this, the modified file will not be loaded into the Tone Editor.

After that, try adjusting each setting while checking the sound with the keyboard.
The most important settings are explained below.

In addition, it is recommended to set each setting by referring to the one in the SEGA Sound Library.

If you want to know more details, please refer to the book about DTM.

● Waveform information settings
If you use commercially available waveform editing software, be sure to check the "Waveform loop method" and the basic key settings.

Figure 2-17 Waveform information settings

● EG (Envelope Generator)
The volume of the sound of a live musical instrument decreases as time passes after it is pronounced, and the timbre changes accordingly. It is EG that sets such a change over time.

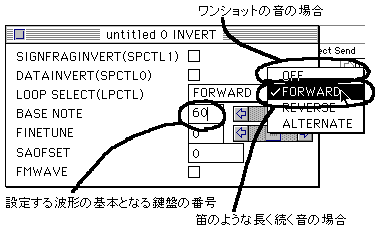
Figure 2-18 EG (Envelope Generator) settings

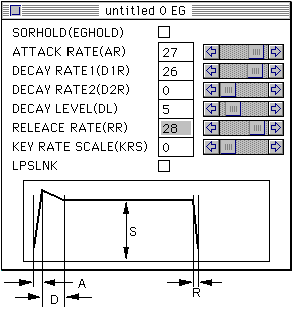
A : Time from when the sound starts to reach the maximum volume
D : Time from maximum volume to sustained volume decay
S : Time that lasts while you hold down the keyboard
R : Time from when the keyboard is released until the sound disappears

● Velocity
Velocity has 127 levels of accuracy when you hit the keyboard.
By doing this, you can change the volume when you play strongly or when you play weakly.
The standard sound settings are roughly as follows.

Figure 2-19 Velocity settings
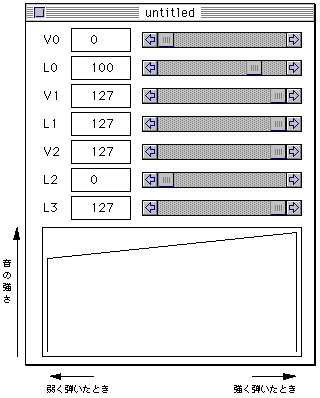

BackForward
SGL User's ManualSOUND STRUCT
Copyright SEGA ENTERPRISES, LTD., 1997